Google Workspace to
Microsoft 365
To get all migration process details contact our professional migration team

Migrate Google Workspace To Microsoft 365 - Office 365
Microsoft 365 or Office 365 supports several methods to migrate email, calendar, and contact data from your existing messaging environment to Microsoft 365 or Office 365 as described in Ways to migrate multiple email accounts to Microsoft 365 or Office 365.
Google Workspace to Microsoft 365 migration
You can migrate batches of users from Google Workspace to Microsoft 365 or Office 365, allowing a migration project to be done in stages. This migration requires that you provision all of your users who will be migrated as mail-enabled users outside of the migration process. You must specify a list of users to migrate for each batch.
All of the procedures assume that your Microsoft 365 or Office 365 domain has already been verified and your TXT records have been set up where also you can move gmail to outlook
Migration from Google Workspace mailboxes using the Microsoft 365 admin center
You can use the setup wizard in the Microsoft 365 admin center for an IMAP migration.
IMPORTANT: IMAP migration will only migrate emails, not calendar and contact information. Users can import their own email, contacts, and other mailbox information to Microsoft 365 or Office 365.
Before Microsoft 365 or Office 365 can connect to Gmail or Google Workspace, all account owners must create an app password to access their account. This is because Google considers Outlook to be a less secure app and will not allow a connection to it with a password alone.
Gmail Migration tasks
The following list contains the migration tasks given in the order in which you should complete them.
Step 1: Verify you own your domain
In this task, you'll first verify to Microsoft 365 or Office 365 that you own the domain you used for your G Suite accounts.
Note: Another option is to use the your company name.onmicrosoft.com domain that is included with your Microsoft 365 or Office 365 subscription instead of using your own custom domain. In that case, you can just add users as described in Add users individually or in bulk and omit this task. Most people, however, prefer to use their own domain.
Domain verification is a task you will go through as you set up Microsoft 365 or Office 365. During setup, the setup wizard provides you with a TXT record you will add at your domain host provider. See Add a domain to Microsoft 365 for the steps to complete in Microsoft 365 admin center, and choose a domain registrar from the two following options to see how to complete add the TXT record that your DNS host provider.
Your current DNS host provider is Google: If you purchased your domain from Google and they are the DNS hosting provider, follow these instructions: Create DNS records when your domain is managed by Google.
You purchased your domain from another domain registrar: If you purchased your domain from a different company, we provide instructions for many popular domain hosting providers.
Step 2: Add users to Microsoft 365 or Office 365
You can add your users either one at a time, or several users at a time. When you add users you also add licenses to them. Each user has to have a mailbox on Microsoft 365 or Office 365 before you can migrate email to it. Each user also needs a license that includes an Exchange Online plan to use his or her mailbox.
Note: At this point you have verified that you own the domain and created your G Suite users and mailboxes in Microsoft 365 or Office 365 with your custom domain. Close the wizard at this step. Do not proceed to Set up domain, until your Gmail mailboxes are migrated to Microsoft 365 or Office 365. You'll finish the setup steps in task 7, Step 6: Update your DNS records to route Gmail directly to Microsoft 365 or Office 365.
Step 3: Create a list of Gmail mailboxes to migrate
For this task, you create a migration file that contains a list of Gmail mailboxes to migrate to Microsoft 365 or Office 365. The easiest way to create the migration file is by using Excel, so we use Excel in these instructions. You can use Excel 2013, Excel 2010, or Excel 2007.
When you create the migration file, you need to know the app password of each Gmail mailbox that you want to migrate. We're assuming you don't know the user passwords, so you'll probably need to assign temporary passwords (by resetting the passwords) to all mailboxes during the migration. You must be an administrator in G Suite to reset passwords.
You don't have to migrate all Gmail mailboxes at once. You can do them in batches at your convenience. You can include up to 50,000 mailboxes (one row for each user) in your migration file. The file can be as large as 10 MB.
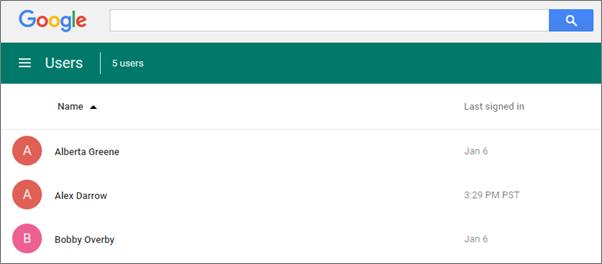
1- Sign in to Google Workspace admin console using your administrator username and password.
2- After you're signed in, choose Users.
G Suite to Microsoft 365 migration
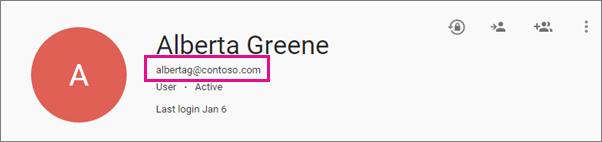
3- Select each user to identify each user's email address. Write down the address.
G Suite to Microsoft 365 migration
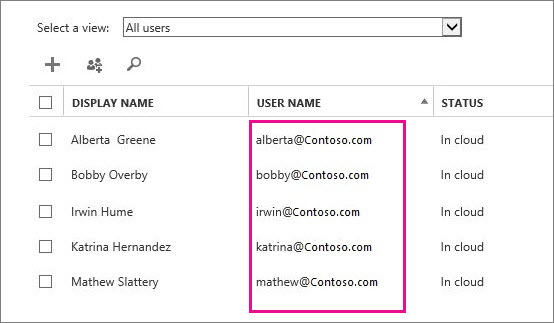
4- Open the Microsoft 365 admin center, and go to Users > Active users. Keep an eye on the Username column. You'll use this information in a minute. Keep the Microsoft 365 admin center window open, too.
G Suite to Microsoft 365 migration
5- Start Excel.
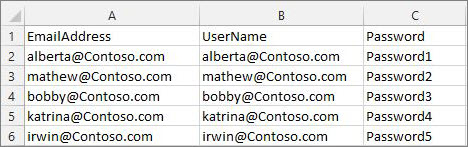
6- Use the following screenshot as a template to create the migration file in Excel. Start with the headings in row 1. Make sure they match the picture exactly and don't contain spaces. The exact heading names are:
- EmailAddress in cell A1.
- UserName in cell B1.
- Password in cell C1.

G Suite to Microsoft 365 migration
7- Next enter the email address, username, and app password for each mailbox you want to migrate. Enter one mailbox per row.
- Column A is the email address of the Microsoft 365 or Office 365 mailbox. This is what's shown in the username column in Users > Active users in the Microsoft 365 admin center.
- Column B is the sign-in name for the user's Gmail mailbox (for example, alberta@contoso.com).
- Column C is the app password for the user's Gmail mailbox. Creating the app password
G Suite to Microsoft 365 migration
8- Save the file as a CSV file type, and then close Excel.

G Suite to Microsoft 365 migration
Step 4: Connect Microsoft 365 or Office 365 to Gmail
To migrate Gmail mailboxes successfully, Microsoft 365 or Office 365 needs to connect and communicate with Gmail. To do this, Microsoft 365 or Office 365 uses a migration endpoint. Migration endpoint is a technical term that describes the settings that are used to create the connection so you can migrate the mailboxes. You create the migration endpoint in this task.
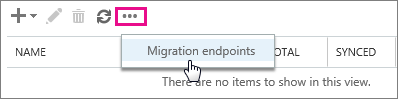
1- Go to the Exchange admin center.
2- In the EAC, go to Recipients > Migration > More  > Migration endpoints.
G Suite to Microsoft 365 migration
3- Click New  to create a new migration endpoint.
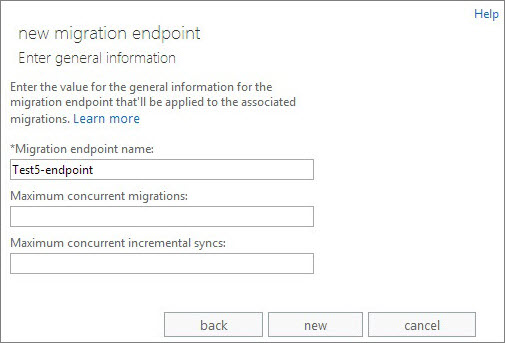
4- On the Select the migration endpoint type page, choose IMAP.
5- On the IMAP migration configuration page, set IMAP server to imap.gmail.com and keep the default settings the same.
6-Click Next. The migration service uses the settings to test the connection to Gmail system. If the connection works, the Enter general information page opens.
7-On the Enter general information page, type a Migration endpoint name, for example, Test5-endpoint. Leave the other two boxes blank to use the default values.
G Suite to Microsoft 365 migration
8- Click New to create the migration endpoint.
Step 5: Create a migration batch and start migrating Gmail mailboxes
You use a migration batch to migrate groups of Gmail mailboxes to Microsoft 365 or Office 365 at the same time. The batch consists of the Gmail mailboxes that you listed in the migration file in the previous Step 4: Connect Microsoft 365 or Office 365 to Gmail.
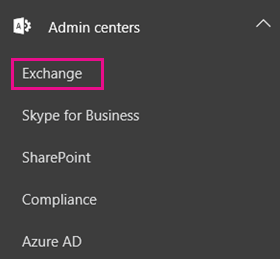
1- In the Microsoft 365 admin center, navigate to Admin centers > Exchange.
G Suite to Microsoft 365 migration
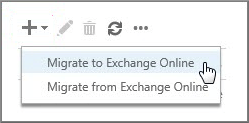
2- In the Exchange admin center, go to Recipients > Migration.
3- Click New New icon > Migrate to Exchange Online.
G Suite to Microsoft 365 migration
4- Choose IMAP migration > Next.
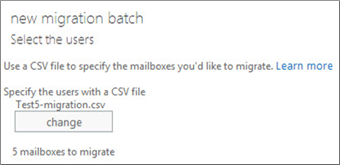
5- On the Select the users page, click Browse to specify the migration file you created. After you select your migration file, Microsoft 365 or Office 365 checks it to make sure:
- It isn't empty.
- It uses comma-separated formatting.
- It doesn't contain more than 50,000 rows.
- It includes the required attributes in the header row.
- It contains rows with the same number of columns as the header row.
If any one of these checks fails, you'll get an error that describes the reason for the failure. If you get an error, you must fix the migration file and resubmit it to create a migration batch.
6- After Microsoft 365 or Office 365 validates the migration file, it displays the number of users listed in the file as the number of Gmail mailboxes to migrate.
G Suite to Microsoft 365 migration
7- Click Next.
8- On the Set the migration endpoint page, select the migration endpoint that you created in the previous step, and click Next.
9- On the IMAP migration configuration page, accept the default values, and click Next.
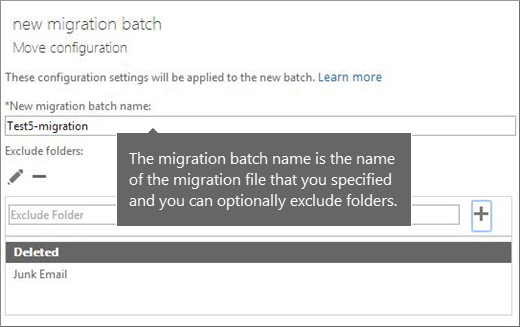
10- On the Move configuration page, type the name (no spaces or special characters) of the migration batch in the box (for example, Test5-migration). The default migration batch name that's displayed is the name of the migration file that you specified. The migration batch name is displayed in the list on the migration dashboard after you create the migration batch.
You can also enter the names of the folders you want to exclude from migration. For example, Shared, Junk Email, and Deleted. Click Add  to add them to the excluded list. You can also click Edit to change a folder name and Delete
  to delete the folder name.
G Suite to Microsoft 365 migration
11- Click Next
12- On the Start the batch page, do the following:
- Choose Browse to send a copy of the migration reports to other users. By default, migration reports are emailed to you. You can also access the migration reports from the properties page of the migration batch.
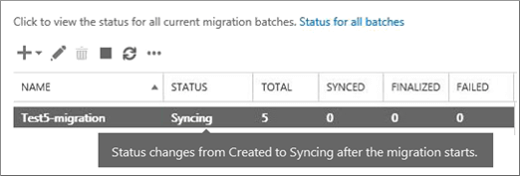
- Choose Automatically start the batch > new. The migration starts immediately with the status Syncing.
G Suite to Microsoft 365 migration
Note: If you have large user mailboxes and the status shows Syncing for a long time, you may be experiencing bandwidth limits set by Google. For more information, see Bandwidth limits and Sync limits. You can try to unlock the Gmail user or use alternative method to migrate the users. For more information, see Use network upload to import your organization PST files to Microsoft 365 or Office 365 and Third-party tools for Microsoft 365 or Office 365 migrations.
Verify that the migration worked
- In the Exchange admin center, go to Recipients > Migration. Verify that the batch is displayed in the migration dashboard. If the migration completed successfully, the status is Synced.
- If this task fails, check the associated Mailbox status reports for specific errors, and double-check that your migration file has the correct Microsoft 365 or Office 365 email address in the EmailAddress column.
Verify a successful mailbox migration to Microsoft 365 or Office 365
Ask your migrated users to complete the following tasks:
- Go to the Microsoft 365 or Office 365 sign-in page and sign in with your username and temporary password.
- Update your password, and set your time zone. It's important that you select the correct time zone to make sure your calendar and email settings are correct.
- When Outlook on the web (formerly known as Outlook Web App) opens, send an email message to another Microsoft 365 or Office 365 user to verify that you can send email.
- Choose Outlook, and check that your email messages and folders are all there.
Optional: Reduce email delays
Although this task is optional, doing it can help avoid delays in the receiving email in the new Microsoft 365 or Office 365 mailboxes.
When people outside of your organization send you email, their email systems don't double-check where to send that email every time. Instead, their systems save the location of your email system based on a setting in your DNS server known as a time-to-live (TTL). If you change the location of your email system before the TTL expires, the sender's email system tries to send email to the old location before figuring out that the location changed. This can result in a mail delivery delay. One way to avoid this is to lower the TTL that your DNS server gives to servers outside of your organization. This will make the other organizations refresh the location of your email system more often.
Most email systems ask for an update each hour if a short interval such as 3,600 seconds (one hour) is set. We recommend that you set the interval at least this low before you start the email migration. This setting allows all the systems that send you email enough time to process the change. Then, when you make the final switch over to Microsoft 365 or Office 365, you can change the TTL back to a longer interval.
The place to change the TTL setting is on your email system's mail exchanger record, also called an MX record. This lives in your public facing DNS. If you have more than one MX record, you need to change the value on each record to 3,600 seconds or less.
Don't worry if you skip this task. It might take longer for email to start showing up in your new Microsoft 365 or Office 365 mailboxes, but it will get there.
Step 6: Update your DNS records to route Gmail directly to Microsoft 365 or Office 365
Email systems use a DNS record called an MX record to figure out where to deliver email. During the email migration process, your MX record was pointing to your Gmail system. Now that you've completed your email migration to Microsoft 365 or Office 365, it's time to point your MX record to Microsoft 365 or Office 365. After you change your MX record following these steps, email sent to users at your custom domain is delivered to Microsoft 365 or Office 365 mailboxes
For many DNS providers, there are specific instructions to change your MX record, If your DNS provider isn't included, or if you want to get a sense of the general directions, general MX record instructions are provided as well.
1- Sign in to Microsoft 365 or Office 365 with your work or school account.
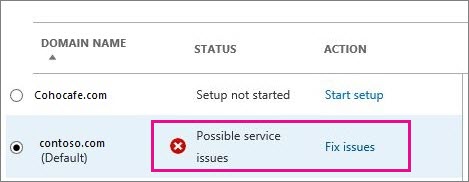
2- Choose Setup > Domains.
3- Select your domain and then choose Fix issues.
The status shows Fix issues because you stopped the wizard partway through so you could migrate your Gmail email to Microsoft 365 or Office 365 before switching your MX record.
G Suite to Microsoft 365 migration
4- For each DNS record type that you need to add, choose What do I fix?, and follow the instructions to add the records for Microsoft 365 or Office 365 services.
5- After you've added all the records, you'll see a message that your domain is set up correctly: Contoso.com is set up correctly. No action is required.
It can take up to 72 hours for the email systems of your customers and partners to recognize the changed MX record. Wait at least 72 hours before you proceed to stopping synchronization with Gmail.
Step 7: Stop synchronization with Gmail
During the last task, you updated the MX record for your domain. Now it's time to verify that all email is being routed to Microsoft 365 or Office 365. After verification, you can delete the migration batch and stop the synchronization between Gmail and Microsoft 365 or Office 365. Before you take this step:
- Make sure that your users are using Microsoft 365 or Office 365 exclusively for email. After you delete the migration batch, email that is sent to Gmail mailboxes isn't copied to Microsoft 365 or Office 365. This means your users can't get that email, so make sure that all users are on the new system.
- Let the migration batch run for at least 72 hours before you delete it. This makes the following two things more likely:
- Your Gmail mailboxes and Microsoft 365 or Office 365 mailboxes have synchronized at least once (they synchronize once a day).
- The email systems of your customers and partners have recognized the changes to your MX records and are now properly sending email to your Microsoft 365 or Office 365 mailboxes.
When you delete the migration batch, the migration service cleans up any records related to the migration batch and removes it from the migration dashboard.
Delete a migration batch
- In the Exchange admin center, go to Recipients > Migration.
- On the migration dashboard, select the batch, and then click Delete.
How do you know this worked?
In the Exchange admin center, navigate to Recipients > Migration. Verify that the migration batch no longer is listed on the migration dashboard.
Step 8: Users migrate their calendar and contacts
After your migrate their email, users can import their Gmail calendar and contacts to Outlook:
- Import contacts to Outlook
- Import Google Calendar to Outlook
Ready to start? Work with a us to migrate email
If none of the types of migrations described will work for your organization, contact the migration team for more information
Contact us to get more information
Why pay extra, when you can pay less?